Learn the essential steps for installing Cat5e and Cat6 cables in your home, including wiring ethernet plugs and setting up a network wall jack.

| Pin | Color |
|---|---|
| 1 | White-Orange |
| 2 | Orange |
| 3 | White-Green |
| 4 | Blue |
| 5 | White-Blue |
| 6 | Green |
| 7 | White-Brown |
| 8 | Brown |
By following these steps, you can install high-speed ethernet connections in your home.
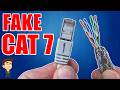
if you plan on installing Cat5e or Cat6 in your home you must learn these two networking installations the first installation is learning how to wire up ethernet plugs the easy way and I'm referring to Cat5e or Cat6 the second installation is installing a network wall jack and this can be Cat5e or Cat6 so first I'm going to show you how to install ethernet plugs the easy way we're going to use Cat6 but you can use Cat5e if you want so like I said you need a cable we're going to do Cat6 you also need RJ45 connectors make sure they're Cat6 as well these are the easy kind and optional is a wire Boot and this boot will protect the RJ45 connector from damage I recommend these but it's optional and that's it for supplies now what tools do you need well really all you're going to need is a crimping tool that's it because this crimping tool also has a blade for doing like cutting and stripping of wires okay the first thing you want to do is cut your ethernet cable to link and make sure to add about four inches this gives two inches for each side to make the RJ45 connection so use the stripping tool on your crimper to remove the sheath just a few twists is all you need this crimping tool is an easy crimper also known as a pass-through crimping tool and this tool was 29 there are cheaper Brands the buyer beware they may not last next unravel all four pairs of wires now you want to go ahead and cut off the white pull string and then unravel all eight pairs of wires this Cat6 Riser cable is 23 gauge this cable is from a company called Southwire and 500 feet of this cable is around 95 dollars which is not bad this castix Riser cable does not have a plastic inner core so this cable is pretty easy to work okay after you unravel all the wires take all eight wires and straighten them out flat the better of a job you do straightening these wires and making them flat the easier it is to put inside the RJ45 connector and if you're going to use a wire boot go ahead and put it on now and a 100 pack of these wire boots is eight dollars all right now I'm going to cut the wire straight across I found this makes it easier to organize the wires into the t568b configuration when the wires are too long they can get kind of Tangled Up so once you've cut the wires go ahead and organize the wires and here's the wiring diagram you have white orange orange white green blue white blue green white brown brown once you have these all organized make sure the wires are straight and flat again and then insert them into the RJ45 connector like this and you can get a hundred of these RJ45 connectors the Cat6 for about 20 bucks push the wires all the way up as far as possible that blue sheath needs to go up all the way inside the RJ45 connector as far as it will go now insert the RJ45 connector into the RJ45 connector on your crimping tool and make sure it's pushed in all the way as far as it'll go then squeeze down until you hear the snap and you can do it one or two more times just to make sure it's a good connection now pull it out the tool and take a close examination to make sure it looks good you can even take a close-up picture with your phone to make sure the wires are in the correct order and the everything looks good now Slide the boot on and you're done all right the second installation is how to install a network wall jack and once again we're using Cat6 but you can use Cat5e as well so guys for this installation it's very simple all you need is a RJ45 wall Jack this is a Cat6 and you're also going to need some cable whether it's Cat5e or Cat6 and regardless of which cable you have Cat5e or Cat6 the wiring is all the same you also need a wall plate one port two port or whatever you want because this will snap in after you're done and you're also going to need a punch down tool now I know what you're going to say this is not very big it's kind of small they make a larger punch down tool but really this works just fine and the great thing about these they're free when you buy a wall jack plug it comes with a punch down tool and the last thing you need is a wire stripper I'm going to go ahead and use this crimping tool because it already has a wire stripper right here alright guys the first thing you want to do is strip back the wires about two inches and FYI most tools have a wire stripper built right into them pretty cool so now all four pairs of wires are exposed go ahead and cut off that white pole string you won't need it and now you can carefully unwrap all eight wires once all eight wires are unwrapped you then want to straighten them out and a little trick I learned use that blue wire cover you just pulled off to help straighten the wires it works great and is easy on your fingers after you straighten out all eight wires you need to separate the wires four to the left and four to the right so on the left going from top to bottom is brown white brown orange orange white and on the right side going from top to bottom is blue white blue white green and green and now you're ready to insert all eight wires into the castix wall jack make sure to push the wires down as far as possible using your fingers and then once they're all pushed down go back with the punch down tool to seat the wires all the way down as far as possible and I usually do this twice to make sure they're all pushed down after they're all pushed down trim off the excess wires and now you can insert the wall jack into the wall plate like this these wall jack plugs come with a wire cover for the top but for some reason I lost mine it's probably somewhere in my toolbox but here's a video clip of that process and this is the finished product and once again guys if you have any questions leave them in the comments below I answer all questions and guys if you like this video give a thumbs up and share it if you love it hit subscribe to keep this channel alive

These are My Top 4 Ethernet Cables for gaming on your PlayStation 5, Xbox, Nintendo Switch and PC! Please Like, Share ...

On this episode of Ultimate Tech Hub we will mount a Linksys Wireless Router to the wall above our network box for a better ...

In this video we Speed Tested EVERY Ethernet cable type from Cat5e to Cat8. We used iPerf3 software to perform the tests.

A hot cup of coffee is a Fantastic Way to Help Support our Channel!☕https://www.buymeacoffee.com/ultimatetechhub Or You Can ...

In this episode I will organize my Home Residential Network Box which has become a mess over the last 10 years. Excess coaxial ...
STOP Buying CAT7 Ethernet! In this video I will test 5 different Cat 7 Ethernet Cables to see which ones are actually Cat7!