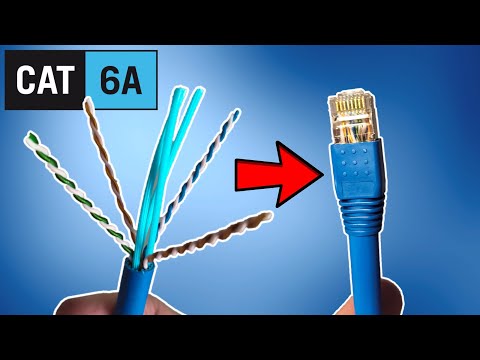
In this tutorial, we’ll show you how to professionally terminate Cat6A Ethernet cable using pass-through connectors and the T568B wiring configuration. This guide also covers essential tools, helpful tips, and how Cat6A compares to other Ethernet cables when it comes to installation.
Before getting started, gather these essential items:
Note: Use pass-through connectors if you're using a pass-through crimper. Traditional Cat6A connectors will not work with this tool and can break during use.
| Pin | Color |
|---|---|
| 1 | White/Orange |
| 2 | Orange |
| 3 | White/Green |
| 4 | Blue |
| 5 | White/Blue |
| 6 | Green |
| 7 | White/Brown |
| 8 | Brown |
If you plan to terminate shielded Cat6A cable, you’ll need specialized connectors with grounding clamps and load bars. These are not covered in this guide but may be featured in a future video.
Hey guys, welcome back! You’re probably wondering why I’m sitting on a thousand feet of Majestic 10-gig Cat6A Ethernet cable. That’s because we’ll soon rewire our entire house with Cat6A.
Today, I’ll show you how to terminate Cat6A Ethernet cable with the correct tools and supplies. Special thanks to JDM Automations in Las Vegas for providing the cable and connectors.
Let’s go over what you’ll need:
Note: Do not use Cat5e tools or connectors—they won’t work properly with Cat6A.
Let’s begin by using the wire stripper. Insert the cable, rotate it, and pull off the jacket. Inside, you’ll find four twisted pairs—green, blue, brown, and orange—and a core spline you’ll need to trim later.
Untwist all pairs and flatten them using the old cable jacket. This makes it easier to arrange the wires in the T568B configuration:
Trim the ends flat and insert them into the pass-through connector. Double-check the wire sequence. Because Cat6A is thick, you may need to slightly compress the jacket so it fits properly into the connector. Use the crimper to press down until it snaps into place.
Pull the connector out and inspect your work—it should look clean and aligned. Finish by adding the boot cover.
If you’re working with shielded Cat6A, you’ll need connectors with grounding clamps and load bars. Let me know in the comments if you’d like a video on that!
As always, like, share, subscribe, and hit the bell icon. See you in the next video. Peace!

This is the "Easy Ethernet Wall Jack Installation" that uses a 45-degree Cat6 Keystone Jack from SatMaximum. These 45-degree ...

Do you need Cat8 Ethernet in your Home or Business Network? Does Cat8 improve your gaming speeds and latency? Watch this ...

On today\'s episode we show you how to test CAT5e, CAT6, & CAT6A Ethernet cables. And we will also show you how to map an ...
Welcome back to The Ultimate Tech Hub. On today\'s episode we will discuss the best way to determine the prime location for your ...

In this video we will show you, " How to Test Ethernet and Fiber Cables! " In order to test ethernet and fiber cables, you need a ...

On today\'s episode we will show you how to punch down / terminate an RJ45 jack for a wall plate. All prices for parts and tools ...