this is our amazing backyard
transformation we transformed this dirt
lot into a backyard Paradise this
includes all Landscaping the pool build
the covered patio and all the landscape
lighting in this entire process took
over two years to complete so now let's
start at the beginning of this process
and the first thing we did was plant
some bushes on the back of that
retaining wall give the backyard some
Life Next we had to dig out the slope
which was 78 feet in length the only
tools we used were shovels a jackhammer
and wheelbarrows in lucky for me my son
was very helpful he worked many hours
helping dig the slope out when it was
all said and done we had removed about
30 tons of rock and dirt and this took
about two weeks to complete we had no
idea it would be this much if I had
known that I would have hired an
excavator to do all the hard work see
all the dirt here
okay we removed
it's probably 30 tons of dirt and now
it's time to build a retaining wall that
runs the entire length of our backyard
which is 78 feet but first you have to
cut a hole through our brick wall to
access the backyard and they spray
painted a line the link to the backyard
where the concrete footing needs to be
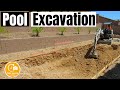
and now they've brought in the excavator
to dig out the trench for the concrete
footing and looking back I should have
hired this excavator to dig out our
entire slope it would have taken one day
what took us over two weeks
so after he's done digging out the
trench for the footing
they're gonna insert some rebar all
along the bottom of the trench
this will provide strength and stability
for the retaining wall and now it's time
for the concrete pour oh and guys don't
forget if you're not subscribed yet
please do it's completely free thanks
the first layer of concrete blocks will
go directly into the concrete and it's
very important to get this level and
straight if it's not then the whole wall
will be crooked once the first layer of
concrete blocks is done they can start
building the wall and this process took
about one day to complete
they're pretty quick
and I have to admit this was a fun
process to watch it's definitely an art
form
and if you live in Las Vegas and you
want to build a retaining wall in your
backyard I'll have all the company's
information listed in the description
below
also near the end of this video
I'm gonna have a full price breakdown on
everything you put in this backyard
and this includes the pool the retaining
wall the patio cover all the lights and
the landscaping and you might be
surprised at the price we paid for this
backyard paradise and remember all these
costs were in 2020 and 2021.
and as you know things have gone up in
cost because of inflation
and shortages
so keep that in mind
and as you can see these guys did a
great job
after they finished building the
retaining wall they sealed the back of
the retaining wall
with a waterproof membrane this prevents
water from seeping through the wall and
now it's time to backfill this wall
before we add any plants and we're going
to add some palm trees and bushes as
well as some more drip irrigation and I
definitely wanted to plant these bushes
before the pool building process and
trying to plant all these bushes after
the pool build would be a huge mess so
once we're done planting all the bushes
the irrigation lines
and The Rock ground cover
we can now Mark the Spot for our pool at
this end of the pool will be our wet
deck and our bubbler and then there'll
be stairs that go into the pool and will
create a large Shelf with a waterfall
this pool is 36 feet long and 13 feet
wide and six feet at the deepest point
of the pool
and now it's time to dig a hole
a very big hole
once again this was definitely a fun
process to watch
it took these two guys four days to dig
out this pool
at this point they framed the pool with
wood and steel rods
and you can see in the back where that
shelf is going to be for the waterfall
and at this point they hit the dreaded
caliche
very hard rock
so they had to break up that rock and
then scoop it out
and we had quite a bit of caliche I
believe they charged 135 dollars an hour
to remove the caliche
and more caliche as you can see
and it did break two machines by the way
that's how hard that stuff is
so the process is break up the cliche
and scoop it out
and then rinse and repeat
and what you're watching here is the
last day of the pool dig
they're almost done all they have to do
is scoop out the deep end which is about
six feet deep
and guys once again we'll have a full
price breakdown for this entire backyard
it'll be near the end of the video
and these guys are all done
the hole is dug
and we're off to Plumbing
this is gonna be fun
and guys don't forget visit our patreon
page we're two dollars a month helps
keep this channel going thanks
so the first thing that gets installed
is the in-ground pool cleaner
this in-ground pool cleaner will clean
the bottom of the pool automatically
as you can see the heat of the PVC pipes
which allows them to curve the pipes
and once it's set they pour water on it
to make it hard again
it's a pretty cool process
the entire pool plumbing process took
about three days
which includes all the pipes and the
pool pump and pool filter and once again
it's pretty amazing to watch this
process there is PVC pipes going
everywhere
but most of these pipes are for the
in-ground pool cleaner
we have 22 pop-ups throughout the pool
and these pop-ups are in stations
with a total of six stations and this
means while the pool pump is running
the in-ground floor cleaner is running
as well which means this pool is clean
all the time and the best part about
that is I don't have to do a thing this
was well worth the price now the rest of
the pipes in this pool are for the
skimmer the return the drain and the
waterfall all of these pipes lead to the
side of the house where the pool pump is
located on the side the house is our
pool pump large pool filter and our
large solar pool heater we'll show you
that installation later in the video but
that was a separate installation
all right now we're done with the pool
plumbing it's time for the rebar and
there's a bunch of it these guys showed
up about seven o'clock in the morning
and were done before noon and that's a
good thing because in Las Vegas in July
it's about 110 degrees during the day
and now it's time for the shot Creed
there's a lot of prep work with the
shotcrete process you don't want this
stuff flying around so basically they
enclosed the entire pool to protect my
house and the landscape
and here comes the concrete truck
and this process is pretty amazing
somehow they hook this hose up to the
concrete truck
and I'm guessing it's pressurized
because that concrete is coming up
pretty fast
and as that big guy sprays the concrete
into the pool
the other guys begin to form the pool
it's really fun to watch how they build
the stairs in those shelves
and even the ledge for the waterfall
anytime you can watch concrete flying
out a hose and then form a shape of a
pool that's pretty freaking cool
this process took one day to complete
and as you can see it took seven guys to
get this all done
after that big guy is done spraying all
the concrete into the pool
the rest of the crew can begin to shape
the pool
as the concrete dries they can shape the
pool
and try to smooth everything out
and round the corners
it doesn't have to be perfect
because the blue quartz plaster will go
over this
the concrete needs to cure for seven
days
so I had to water the concrete twice a
day for seven days
and now it's on to the tile installation
and we chose a pool tile that looks like
marble
kind of that Greek look
so what they're doing now is adding wood
planks all along the bottom where the
tile will rest on when they install it
it's kind of a guide
and it definitely makes installing the
tile much easier
and now they're going to towel the
waterfall
and guys don't forget hit subscribe it's
completely free thanks
and once they're done installing the
tile they're gonna go back and grout it
and after they're done grouting it
they'll wipe it off
and now we're all done with the tile
and now they can install the LED pool
light pretty quick
and now it's time to pour the patio and
we have a lot of square feet of patio
but first they have to prep it get it
all flat it took a lot of guys all day
to get this done once they get the
ground all flat they'll add two by fours
to frame the patio and this process took
about two days just to prep it once
they're done prepping for the patio they
can begin to pour the concrete and this
is pretty amazing and it took a lot of
guys to get this done they started
pretty early in the morning and finished
when the sun went down
and once again this is definitely an art
form
just watching how they spread the
concrete out
and then get a flat and level
and then smooth it out
and then they add the drainage lines for
the water to run off
and then they go back and brush it
it was a sight to behold they did a
fantastic job truly amazing
and guys don't forget at the end of this
video
I'll show you the price breakdown for
everything the grand total
and it wasn't as expensive
as I initially thought it would be
so make sure to watch till the end of
the video now it's on to the last step
which is the quartz pool spray and we
chose Caribbean Blue a beautiful color
before they spray the quartz plaster
they have to prep the pool
by removing any debris and washing it
off the concrete once the concrete is
nice and clean
they can begin to spray the quartz
plaster
it reminds me of Shaving gel coming out
the hose
after they spray on the Caribbean blue
quartz plaster
they'll begin to shape it and smooth it
out
and as the plaster begins to dry they'll
keep working it and smoothing it out
and then they'll wait some more and then
smooth it out again
and then rinse and repeat
until it's all done once again it's an
awesome thing to watch
and once it's all done
I can then add the water and this took
24 hours to fill up
for about eighteen thousand gallons and
the pool build is done
and now on to the solar pool heater
installation the solar pool heater will
heat our pool for free in the summer
pretty cool
so the water from the pool will travel
up the roof to the pool heater
which is plastic tubes and the sun will
heat these tubes up
which in turn heats the water and then
the water travels back down the tubes to
the pool pump
where warm water is pumped back into the
pool
it's really that simple
and the thermostat comes with this pool
heater
so we can set it and forget it
we keep our pool between 85 and 91
degrees
which is very comfortable
and they're all done looks great
and now we're going to install some LED
lights
these LED lights are controlled with a
remote and they're also on a timer
so once again set it and forget it
oh guys don't forget if you like this
video give a thumbs up and share it if
you love it hit subscribe it's
completely free thanks
it's really amazing what a set of lights
will do to your backyard it makes a huge
difference
next is the turf installation they
installed the turf on the side of the
house first and it took two large rolls
for this install all they do is roll the
turf out and then cut the size
this reminds me of a carpet installation
once they roll out the turf
they simply cut it to size
and they secure the turf to the ground
with nails
and they use a lot of nails
and they're also going to have to
connect that seam in the middle
look connect it and Hammer it down
until you can't see that seam anymore it
it basically disappears
and this installation took a full day
however I decided not to show the prep
work where they add the sand and made
the ground level
it was kind of boring to watch
well the turf looks great and feels
great
and what a difference some green can
make
now before we install the turf around
the pool
we're gonna stucco and paint that
retaining wall make it look pretty
and once again it took a full day to
stucco the entire wall
and this is a very cool process to watch
they transformed this ugly concrete wall
into something really beautiful
so after they're done stucco in the wall
we'll let it dry for a couple days and
then they're gonna come back and paint
the whole wall and the color we chose
matches our house
so it took about a half a day to paint
this wall it was a very quick process
and going from that ugly concrete
retaining wall
to a beautiful stucco painted wall is a
big Improvement
and let me know in the comments what you
think about this wall
do you like it or do you prefer the
block wall
and once they're done painting the wall
and let it dry for a couple of days
they're gonna come back and add that
Turf around the pool all they did was
cut some Turf into long pieces about 12
inches wide and then lay it down and
nail it into place
pretty simple process
and the main reason we chose artificial
grass over real grass is two things the
maintenance and saving water
and a bonus with going with artificial
turf is that there's less bugs
we still have a few ants but that's
really it
and now we're all done with the turf
installation
looking good
now we're going to add some blights to
the backyard
these are argb smart lights from XM cozy
and these lights have a variety of color
patterns to choose from and can be set
to turn on and off at different times
so they're fully automated and one of
the main goals of our backyard Paradise
is that everything is on a timer we set
it and forget it I gotta be honest I got
a bit nervous on this ladder especially
at the top of that roof that was about
24 feet otherwise a very easy
installation
screw in a hook and hang the light and
we're all done and let's check out some
different color modes and with these
lights you can adjust the brightness
and change the light colors to whatever
you want and there's nine different
scenes as well this one is called Chase
now it's time for the cover patio
install
and we hired Coda patios out of Las
Vegas for the installation
this install took one day to complete
they were fast and efficient
this patio cover is well built
and stands up to a lot of wind and heat
so guys stay tuned for the full price
breakdown at the end of this video we're
almost there the main reason we decided
to put a patio cover right here
was so that when we're in the pool in
the shallow end we get a little bit of
shade
without this patio cover the backyard
pool deck gets hammered by the sun all
day with no relief
and they have two more pieces to install
and then they're all done
and this patio cover even has a gutter
so when it rains
the water is pulled away from the patio
alright it's time to add some lights to
this patio cover these are the same
brand lights we use for the house except
these are only white however these are
dimmable so we can adjust the brightness
and once again these are on a schedule
so they go on and off at the same time
as the house lights
fully automated
alright guys it's time for the full
price breakdown
for the entire backyard Paradise first
the retaining wall costs around eight
thousand dollars all plants on both
retaining walls total in at four
thousand dollars the entire pool with
the pool deck is fifty five thousand
dollars the solar pool here was three
thousand dollars all the turf and the
painted stucco wall total ten thousand
dollars the covered patio cost three
thousand dollars and all the landscape
lighting was around four hundred dollars
with a grand total of eighty three
thousand four hundred dollars guys thank
you so much for watching I really
appreciate it make sure to like share
subscribe comment and for God's sakes
hit the Bell icon and we'll see you real
soon
peace